WebGL Ramp Textures
WebGL 一个重要的实现就是纹理并不仅仅我们在关于纹理的文章中提到的应用在三角形上的东西。纹理是随机访问数据的数组,通常是 2D 数据数组。所以,我们可以在所有随机访问数组数据的地方使用纹理。
在WebGL 三维方向光源中,我们提到我们如何使用点乘来计算两个向量之间的角度。在那个场景下我们计算光线方向和模型表面法线的点乘可以得到两个向量夹角的 consine。consine 的值从 -1 到 1,我们用它直接作为颜色的倍增器。
float light = dot(normal, u_reverseLightDirection);

gl_FragColor = u_color;
gl_FragColor.rgb *= light;
这会使得背光面颜色变暗。
如果我们不直接使用点乘,而是用它来查找一维纹理的值呢?
precision mediump float;

// Passed in from the vertex shader.
varying vec3 v_normal;

uniform vec3 u_reverseLightDirection;
uniform vec4 u_color;
+uniform sampler2D u_ramp;

void main() {
  // because v_normal is a varying it's interpolated
  // so it will not be a unit vector. Normalizing it
  // will make it a unit vector again
  vec3 normal = normalize(v_normal);

-  float light = dot(normal, u_reverseLightDirection);
+  float cosAngle = dot(normal, u_reverseLightDirection);
+
+  // convert from -1 <-> 1 to 0 <-> 1
+  float u = cosAngle * 0.5 + 0.5;
+
+  // make a texture coordinate
+  vec2 uv = vec2(u, 0.5);
+
+  // lookup a value from a 1d texture
+  vec4 rampColor = texture2D(u_ramp, uv);
+
  gl_FragColor = u_color;
-  gl_FragColor.rgb *= light;
+  gl_FragColor *= rampColor;
}
我们需要创建一个纹理,让我们从 2x1 的纹理开始。我们将使用 LUMINANCE 来格式化每个像素只用一个字节的单色纹理。
var tex = gl.createTexture();
gl.bindTexture(gl.TEXTURE_2D, tex);
gl.texImage2D(
    gl.TEXTURE_2D,     // target
    0,                 // mip level
    gl.LUMINANCE,      // internal format
    2,                 // width
    1,                 // height
    0,                 // border
    gl.LUMINANCE,      // format
    gl.UNSIGNED_BYTE,  // type
    new Uint8Array([90, 255]));
gl.texParameteri(gl.TEXTURE_2D, gl.TEXTURE_WRAP_S, gl.CLAMP_TO_EDGE);
gl.texParameteri(gl.TEXTURE_2D, gl.TEXTURE_WRAP_T, gl.CLAMP_TO_EDGE);
gl.texParameteri(gl.TEXTURE_2D, gl.TEXTURE_MIN_FILTER, gl.NEAREST);
gl.texParameteri(gl.TEXTURE_2D, gl.TEXTURE_MAG_FILTER, gl.NEAREST);
以上两个像素的颜色是深灰色(90)和白色(255)。我们还设置了纹理参数,这样就不会有过滤。
编辑例子,我们通过 u_ramp 的 uniform 来查找新纹理
var worldViewProjectionLocation = gl.getUniformLocation(program, "u_worldViewProjection");
var worldInverseTransposeLocation = gl.getUniformLocation(program, "u_worldInverseTranspose");
var colorLocation = gl.getUniformLocation(program, "u_color");
+var rampLocation = gl.getUniformLocation(program, "u_ramp");
var reverseLightDirectionLocation =
    gl.getUniformLocation(program, "u_reverseLightDirection");
然后我们需要在渲染的时候设置纹理
// bind the texture to active texture unit 0
gl.activeTexture(gl.TEXTURE0 + 0);
gl.bindTexture(gl.TEXTURE_2D, tex);
// tell the shader that u_ramp should use the texture on texture unit 0
gl.uniform1i(rampLocation, 0);
我用一个低多边形的头的来替换了灯光例子中 3D F 的数据。运行它我们得到以下内容
如果你旋转模型,你会看到它看起来像卡通着色;
在上面的例子中我们设置纹理的过滤模式为 NEAREST,这意味着我们仅仅为我们的颜色从纹理中选择最接近的像素。这里只有两个像素,所以当表面正对着光的时候我们选择第一个像素(深灰),当表面背对着光的时候我们选择第二个像素(白)。这个颜色会和 gl_FragColor 相乘,就像 light 一样。
思考一下,如果我们使用 LINEAR 来过滤,我们将会得到和使用纹理之前一样的结果,让我们尝试一下。
-gl.texParameteri(gl.TEXTURE_2D, gl.TEXTURE_MIN_FILTER, gl.NEAREST);
-gl.texParameteri(gl.TEXTURE_2D, gl.TEXTURE_MAG_FILTER, gl.NEAREST);
+gl.texParameteri(gl.TEXTURE_2D, gl.TEXTURE_MIN_FILTER, gl.LINEAR);
+gl.texParameteri(gl.TEXTURE_2D, gl.TEXTURE_MAG_FILTER, gl.LINEAR);
它们看起来相似但是如果我们把它们放在一起比较。。。
我们可以发现它们不一样,为什么?
LINEAR 过滤混合了两个像素。如果我们放大两个像素的纹理,通过线性过滤我们可以看到问题

每边有半个像素没有插值。想象一下,如果我们将纹理的 TEXTURE_WRAP_S 设置成 REPEAT。我们将会期望红色像素的最左边向绿色过度就好像绿色在左边重复一样。但是左边更红,因为我们使用了 CLAMP_TO_EDGE。
为了得到一个真正的渐变,我们需要只在中心范围中选择值,我们可以在我们的着色器中加入一些数学运算
precision mediump float;

// Passed in from the vertex shader.
varying vec3 v_normal;

uniform vec3 u_reverseLightDirection;
uniform vec4 u_color;
uniform sampler2D u_ramp;
+uniform vec2 u_rampSize;

void main() {
  // because v_normal is a varying it's interpolated
  // so it will not be a unit vector. Normalizing it
  // will make it a unit vector again
  vec3 normal = normalize(v_normal);

  float cosAngle = dot(normal, u_reverseLightDirection);

  // convert from -1 <-> 1 to 0 <-> 1
  float u = cosAngle * 0.5 + 0.5;

  // make a texture coordinate.
  vec2 uv = vec2(u, 0.5);

+  // scale to size of ramp
+  vec2 texelRange = uv * (u_rampSize - 1.0);
+
+  // offset by half a texel and convert to texture coordinate
+  vec2 rampUV = (texelRange + 0.5) / u_rampSize;

-  vec4 rampColor = texture2D(u_ramp, uv);
+  vec4 rampColor = texture2D(u_ramp, rampUV);

  gl_FragColor = u_color;
  gl_FragColor *= rampColor;
}
上面我们缩放 uv 坐标从 0 到 1 比纹理宽度小 1。然后添加半个像素来转化回规范化的纹理坐标。
我们需要查找 u_rampSize 的位置
var colorLocation = gl.getUniformLocation(program, "u_color");
var rampLocation = gl.getUniformLocation(program, "u_ramp");
+var rampSizeLocation = gl.getUniformLocation(program, "u_rampSize");
然后我们需要在渲染的时候设置它
// bind the texture to active texture unit 0
gl.activeTexture(gl.TEXTURE0 + 0);
gl.bindTexture(gl.TEXTURE_2D, tex);
// tell the shader that u_ramp should use the texture on texture unit 0
gl.uniform1i(rampLocation, 0);
+gl.uniform2fv(rampSizeLocation, [2, 1]);
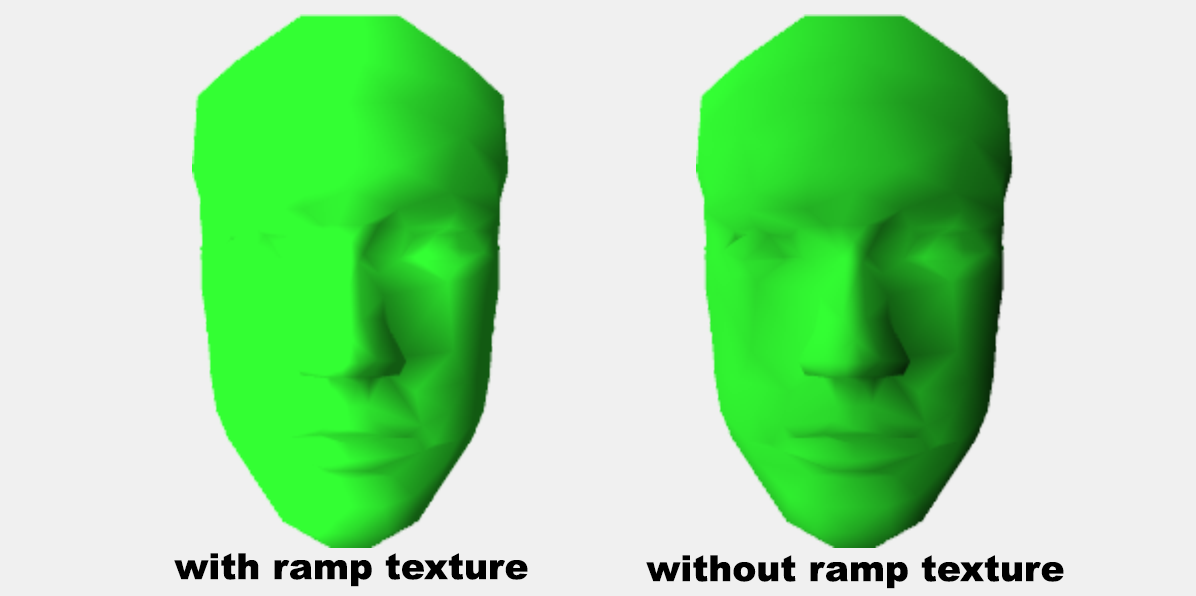
在我们运行它之前让我们加一个开关使得我们可以比较有无 ramp texture 的区别
precision mediump float;

// Passed in from the vertex shader.
varying vec3 v_normal;

uniform vec3 u_reverseLightDirection;
uniform vec4 u_color;
uniform sampler2D u_ramp;
uniform vec2 u_rampSize;
+uniform bool u_useRampTexture;

void main() {
  // because v_normal is a varying it's interpolated
  // so it will not be a unit vector. Normalizing it
  // will make it a unit vector again
  vec3 normal = normalize(v_normal);

  float cosAngle = dot(normal, u_reverseLightDirection);

  // convert from -1 <-> 1 to 0 <-> 1
  float u = cosAngle * 0.5 + 0.5;

  // make a texture coordinate.
  vec2 uv = vec2(u, 0.5);

  // scale to size of ramp
  vec2 texelRange = uv * (u_rampSize - 1.0);

  // offset by half a texel and convert to texture coordinate
  vec2 rampUV = (texelRange + 0.5) / u_rampSize;

  vec4 rampColor = texture2D(u_ramp, rampUV);

+  if (!u_useRampTexture) {
+    rampColor = vec4(u, u, u, 1);
+  }

  gl_FragColor = u_color;
  gl_FragColor *= rampColor;
}
查找 uniform 的位置
var rampLocation = gl.getUniformLocation(program, "u_ramp");
var rampSizeLocation = gl.getUniformLocation(program, "u_rampSize");
+var useRampTextureLocation = gl.getUniformLocation(program, "u_useRampTexture");
并设置
var data = {
  useRampTexture: true,
};

...

// bind the texture to active texture unit 0
gl.activeTexture(gl.TEXTURE0 + 0);
gl.bindTexture(gl.TEXTURE_2D, tex);
// tell the shader that u_ramp should use the texture on texture unit 0
gl.uniform1i(rampLocation, 0);
gl.uniform2fv(rampSizeLocation, [2, 1]);

+gl.uniform1i(useRampTextureLocation, data.useRampTexture);
然后我们可以看到旧的光照方式和新的 ramp texture 的方式是匹配的
点击 "useRampTexture" 复选框我们可以看到两种技术之间没有变化
注意:我通常不推荐在 shader 中使用像
u_useRampTexture这样的条件。我会用两个 shader 程序来替代,一个使用通常的光照然后另一个使用 ramp texture。不幸的是的代码没有使用我们的帮助库,它需要相当大的改动才能支持两个 shader 程序。每个程序有它自己的一组位置,那么大的改动会让读者从本文的重点中偏离,所以我决定使用条件语句。通常来说我会通过创建不同功能的 shader 来替代使用条件语句选择功能。
注意:上面的数学公式只在我们使用 LINEAR 过滤的时候才重要,如果我们使用 NEAREST 过滤,我们需要原始的数学。
现在我们已经知道了 ramp 正确的数学处理,让我们来创建一堆不同的 ramp 纹理。
+// make a 256 array where elements 0 to 127
+// go from 64 to 191 and elements 128 to 255
+// are all 255.
+const smoothSolid = new Array(256).fill(255);
+for (let i = 0; i < 128; ++i) {
+  smoothSolid[i] = 64 + i;
+}
+
+const ramps = [
+  { name: 'dark-white',          color: [0.2, 1, 0.2, 1], format: gl.LUMINANCE, filter: false,
+    data: [80, 255] },
+  { name: 'dark-white-skewed',   color: [0.2, 1, 0.2, 1], format: gl.LUMINANCE, filter: false,
+    data: [80, 80, 80, 255, 255] },
+  { name: 'normal',              color: [0.2, 1, 0.2, 1], format: gl.LUMINANCE, filter: true,
+    data: [0, 255] },
+  { name: '3-step',              color: [0.2, 1, 0.2, 1], format: gl.LUMINANCE, filter: false,
+    data: [80, 160, 255] },
+  { name: '4-step',              color: [0.2, 1, 0.2, 1], format: gl.LUMINANCE, filter: false,
+    data: [80, 140, 200, 255] },
+  { name: '4-step skewed',       color: [0.2, 1, 0.2, 1], format: gl.LUMINANCE, filter: false,
+    data: [80, 80, 80, 80, 140, 200, 255] },
+  { name: 'black-white-black',   color: [0.2, 1, 0.2, 1], format: gl.LUMINANCE, filter: false,
+    data: [80, 255, 80] },
+  { name: 'stripes',             color: [0.2, 1, 0.2, 1], format: gl.LUMINANCE, filter: false,
+    data: [80, 255, 80, 255, 80, 255, 80, 255, 80, 255, 80, 255, 80, 255, 80, 255, 80, 255, 80, 255, 80, 255, 80, 255, 80, 255, 80, 255, 80, 255, 80, 255] },
+  { name: 'stripe',              color: [0.2, 1, 0.2, 1], format: gl.LUMINANCE, filter: false,
+    data: [80, 80, 80, 80, 80, 80, 80, 80, 80, 80, 80, 80, 0, 0, 255, 255, 255, 255, 255, 255, 255, 255, 255, 255, 255, 255, 255, 255] },
+  { name: 'smooth-solid',        color: [0.2, 1, 0.2, 1], format: gl.LUMINANCE, filter: false,
+    data: smoothSolid },
+  { name: 'rgb',                 color: [  1, 1,   1, 1], format: gl.RGB,       filter: true,
+    data: [255, 0, 0, 0, 255, 0, 0, 0, 255] },
+];
+
+var elementsForFormat = {};
+elementsForFormat[gl.LUMINANCE] = 1;
+elementsForFormat[gl.RGB      ] = 3;
+
+ramps.forEach((ramp) => {
+  const {name, format, filter, data} = ramp;
  var tex = gl.createTexture();
  gl.bindTexture(gl.TEXTURE_2D, tex);
+  gl.pixelStorei(gl.UNPACK_ALIGNMENT, 1);
+  const width = data.length / elementsForFormat[format];
  gl.texImage2D(
      gl.TEXTURE_2D,     // target
      0,                 // mip level
*      format,            // internal format
*      width,
      1,                 // height
      0,                 // border
*     format,            // format
      gl.UNSIGNED_BYTE,  // type
*      new Uint8Array(data));
  gl.texParameteri(gl.TEXTURE_2D, gl.TEXTURE_WRAP_S, gl.CLAMP_TO_EDGE);
  gl.texParameteri(gl.TEXTURE_2D, gl.TEXTURE_WRAP_T, gl.CLAMP_TO_EDGE);
*  gl.texParameteri(gl.TEXTURE_2D, gl.TEXTURE_MIN_FILTER, filter ? gl.LINEAR : gl.NEAREST);
*  gl.texParameteri(gl.TEXTURE_2D, gl.TEXTURE_MAG_FILTER, filter ? gl.LINEAR : gl.NEAREST);
+  ramp.texture = tex;
+  ramp.size = [width, 1];
+});
让我们创建一个可以同时处理 NEAREST 和 LINEAR 的 shader。像我上面提到的我通常不在 shader 中使用 boolean 条件判断。但是如果区别很简单可以在不使用条件的情况下实现,我会考虑使用一个 shader。为了实现它我们可以添加一个 float 的 uniform u_linearAdjust,这里我们将其设置成 0.0 或者 1.0
precision mediump float;

// Passed in from the vertex shader.
varying vec3 v_normal;

uniform vec3 u_reverseLightDirection;
uniform vec4 u_color;
uniform sampler2D u_ramp;
uniform vec2 u_rampSize;
-uniform bool u_useRampTexture;
-uniform float u_linearAdjust;  // 1.0 if linear, 0.0 if nearest

void main() {
  // because v_normal is a varying it's interpolated
  // so it will not be a unit vector. Normalizing it
  // will make it a unit vector again
  vec3 normal = normalize(v_normal);

  float cosAngle = dot(normal, u_reverseLightDirection);

  // convert from -1 <-> 1 to 0 <-> 1
  float u = cosAngle * 0.5 + 0.5;

  // make a texture coordinate.
  vec2 uv = vec2(u, 0.5);

  // scale to size of ramp
-  vec2 texelRange = uv * (u_rampSize - 1.0);
+  vec2 texelRange = uv * (u_rampSize - u_linearAdjust);

-  // offset by half a texel and convert to texture coordinate
-  vec2 rampUV = (texelRange + 0.5) / u_rampSize;
+  // offset by half a texel if linear and convert to texture coordinate
+  vec2 rampUV = (texelRange + 0.5 * u_linearAdjust) / u_rampSize;

  vec4 rampColor = texture2D(u_ramp, rampUV);

-  if (!u_useRampTexture) {
-    rampColor = vec4(u, u, u, 1);
-  }

  gl_FragColor = u_color;
  gl_FragColor *= rampColor;
}
在初始化的时候我们查找一下位置
var colorLocation = gl.getUniformLocation(program, "u_color");
var rampLocation = gl.getUniformLocation(program, "u_ramp");
var rampSizeLocation = gl.getUniformLocation(program, "u_rampSize");
+var linearAdjustLocation = gl.getUniformLocation(program, "u_linearAdjust");
在渲染的时候我们选择其中一个纹理
var data = {
  ramp: 0,
};

...
+const {texture, color, size, filter} = ramps[data.ramp];

// Set the color to use
-gl.uniform4fv(colorLocation, [0.2, 1, 0.2, 1]);
+gl.uniform4fv(colorLocation, color);

// set the light direction.
gl.uniform3fv(reverseLightDirectionLocation, m4.normalize([-1.75, 0.7, 1]));

// bind the texture to active texture unit 0
gl.activeTexture(gl.TEXTURE0 + 0);
-gl.bindTexture(gl.TEXTURE_2D, tex);
+gl.bindTexture(gl.TEXTURE_2D, texture);
// tell the shader that u_ramp should use the texture on texture unit 0
gl.uniform1i(rampLocation, 0);
-gl.uniform2fv(rampSizeLocation, [2, 1]);
+gl.uniform2fv(rampSizeLocation, size);

+// adjust if linear
+gl.uniform1f(linearAdjustLocation, filter ? 1 : 0);
尝试不同的 ramp 纹理你可以看到很多奇怪的效果,这是一个调整 shader 的通用方法。你可以创建一个通过设置两种颜色和一个阈值来实现一个 2 色的卡通着色器。
uniform vec4 color1;
uniform vec4 color2;
uniform float threshold;

...

  float cosAngle = dot(normal, u_reverseLightDirection);

  // convert from -1 <-> 1 to 0 <-> 1
  float u = cosAngle * 0.5 + 0.5;

  gl_FragColor = mix(color1, color2, step(cosAngle, threshold));
这很有效,但是让你想要 3 步或者 4 步的版本,你需要写另一个着色器。通过一个 ramp 纹理你只需要提供不同的纹理即可。此外,注意上面,即使你想要 2 步的卡通着色器,你也通过在你的纹理中加入或多或少数据来调整颜色发生变化的地方。例如一个包含以下内容的纹理
[dark, light]
给你一个 2 个步骤的纹理,他会按照面对光和背对光从中间分开,但是一个纹理像
[dark, dark, dark, light, light]
可以在不改变着色器的情况下将面光的背光的分割点移动到 60% 的位置
这个使用 ramp 纹理来实现卡通着色和奇怪效果的例子可能对你有用也可能对你无用,但是重要的是使用值从纹理中查找数据的基本概念。
使用纹理不仅仅是为了转换光线的计算,你也可以使用 ramp 纹理为了 post processing 来实现 the gradient map in photoshop 一样的效果。
你也可以使用渐变纹理做基于 GPU 的动画。你可以存储你的关键值在纹理中,然后通过时间来移动你的纹理,这种技术很有用。